aerofly-startgeraet
 Aerofly Startgerät - CLI Tool
Requirements
This application supports computers running Microsoft Windows, Apple macOS and Linux.
The Aerofly Startgerät is a Command Line Interface (CLI) tool, which means you need to open a terminal to run it.
Installation
There are two installation options:
- Installation via Node.js / NPM (recommended, auto-updating)
- Installation as executable file
1. Installation via Node.js / NPM
This installation method requires Node.js in at least version 20 to be installed on your local computer.
- Visit nodejs.org
- Download the LTS (Long Term Support) version
- Run the installer and follow the setup wizard
- Open your terminal application and verify the correct installation:
node --version
The Aerofly Startgerät runs directly via npx installed alongside node, which automatically downloads and executes the latest version.
Call this tool by opening the pre-installed terminal application of your computer and execute this command:
npx @fboes/aerofly-startgeraet@latest
This will automatically download the latest version of this application and show the main menu of the Aerofly Startgerät.
2. Installation as executable file
If you do not want to have Node.js installed, you can also download a pre-compiled version of this tool, which runs on our local machine.
- Download the latest Aerofly Startgerät CLI tool from the Github releases at https://github.com/fboes/aerofly-startgeraet/releases/.
- Move the Aerofly Startgerät CLI tool to a sensible location and mark it as executable (see below).
- Start the Aerofly Startgerät CLI tool (see below).
Linux / macOS
After downloading, mark the file as executable:
# Linux
chmod +x aerofly-startgeraet-cli-linux
# or on macOS - Silicon chip
chmod +x aerofly-startgeraet-cli-macos-arm64
# or on macOS - Intel chip
chmod +x aerofly-startgeraet-cli-macos-x64
Then run it:
# Linux
./aerofly-startgeraet-cli-linux
# or on macOS - Silicon chip
./aerofly-startgeraet-cli-macos-arm64
# or on macOS - Intel chip
./aerofly-startgeraet-cli-macos-x64
macOS Gatekeeper
macOS may block the file as it is from an unidentified developer. To allow it:
xattr -dr com.apple.quarantine aerofly-startgeraet-cli-macos-arm64
Or via System Settings → Privacy & Security → Allow anyway.
Windows
Simply double-click aerofly-startgeraet-cli-windows.exe or run it in PowerShell:
.\aerofly-startgeraet-cli-windows.exe
For convenience you may want to add a desktop shortcut:
- Right click on the the application
- Select “Create Shortcut”
- Drag the shortcut to your desktop
Usage
Call this tool by opening the pre-installed terminal application of your computer and execute the command matching you installation method.
[!WARNING] Aerofly FS 4 must not be started while using the Aerofly Startgerät. Settings generated by the Aerofly Startgerät will only be read by Aerofly FS 4 on start-up of the simulator.
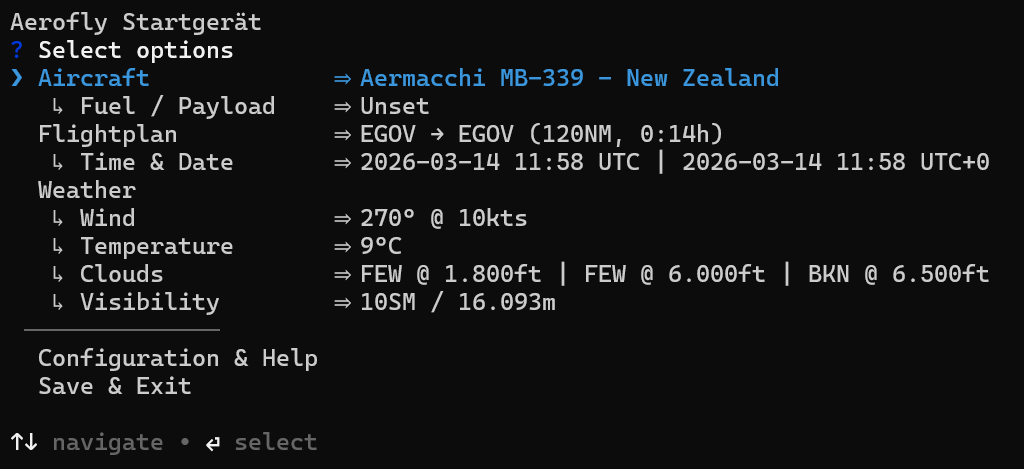
This will show the main menu of the Aerofly Startgerät.
On start-up this will load the current settings of Aerofly FS 4 by inspecting the main.mcf configuration file. If the file cannot be found automatically, the Aerofly Startgerät will ask for its location.
On a successful start-up, you will see a text menu. To select an option, use the arrow keys and press enter.
On exiting the Aerofly Startgerät, your changes will be saved back to the main.mcf and will be available on starting Aerofly FS 4 the next time.
[!WARNING] The Aerofly Startgerät may break your
main.mcf. Be sure to have a backup of this file.
Short-hand CLI commands
There are also short-hand CLI commands which solve a single task without any user interaction:
# Import current SimBrief flightplan
[YOUR START COMMAND] simbrief

# Import METAR weather for current departure airport , time & date
[YOUR START COMMAND] metar

# Set simulator time & date to current time & date
[YOUR START COMMAND] time